
The fastest route for most small businesses is to pick a payment service provider (PSP) with a hosted checkout, connect your bank account, and go live within a day or two. Here is the three-step path:
- Choose your approach — hosted checkout for speed, embedded checkout if you need a custom look, or payment links if you sell services without a full website.
- Set up your account and payout details — verify your identity, add your bank account, and configure your product or service descriptors.
- Integrate and test — run a test transaction, confirm the payout route, then flip to live mode.
For early-stage businesses, a hosted checkout is the right default. You skip developer work, reduce your compliance burden, and can start selling the same week. Graduate to an embedded or API integration once volume or branding needs justify the extra build time.
Key Takeaways
The fastest path to accepting payments online is a hosted checkout through a PSP, verified in under a day, with cards and one digital wallet enabled from the start.
| Point | Details |
|---|---|
| Start with hosted checkout | No developer needed; gets you live in hours and keeps PCI scope minimal. |
| PSPs beat merchant accounts early on | Faster onboarding and bundled tools make PSPs the right default for new businesses. |
| Fee structures vary widely | Card-not-present fees typically run in a low single-digit percentage plus a small per-transaction fee; ACH fees are generally lower percentage-based charges often capped. |
| Recurring billing needs dunning | Automated retries and customer notifications cut involuntary churn significantly. |
| Aria consolidates the full stack | Aria connects checkout, memberships, courses, and CRM in one dashboard, replacing multiple tools. |
Table of Contents
- How can you accept payments online? A breakdown of your options
- Merchant account vs. PSP: which model fits your business?
- What do payment processing fees actually cost?
- How to integrate payments on your website
- Which payment methods should you offer first?
- Security basics every small business must handle
- How to set up recurring payments and reduce churn
- Your go-live checklist and realistic timeline
- What I'd actually recommend for most small businesses
- Why Aria makes accepting payments simpler for creators and entrepreneurs
- Sources
How can you accept payments online? A breakdown of your options
The method you choose shapes everything from your setup time to your customer's checkout experience.
Payment links and buy buttons are the lowest-friction option. You generate a link or embed a button, share it via email, social media, or a simple landing page, and customers pay without you building a checkout flow. PayPal's payment buttons support PayPal, Venmo (US), Apple Pay, Pay Later, and major cards with minimal code. This approach suits appointment-based sellers, coaches, and anyone selling a single product or service.
Hosted checkout pages hand the entire checkout experience to your PSP. The customer leaves your site briefly, completes payment on a secure page, and returns. Stripe Checkout is a well-known example, offering full-page hosted flows with options to save customer payment details for future purchases. Setup is fast, PCI scope is minimal, and no developer is required.
Embedded checkout and API/SDK integrations keep the customer on your site throughout. You control the design, the field layout, and the flow. The trade-off is real: you need a developer, you take on more PCI responsibility, and testing takes longer. This path makes sense once your brand experience is a genuine conversion driver.
Invoices, QR codes, and virtual terminals round out the toolkit for service businesses. Send a payment link inside an invoice for net-30 clients, generate a QR code for in-person events, or key in a card number through a virtual terminal for phone orders. Square's unified approach covers online stores, payment links, and POS hardware in one account, which works well for businesses that sell both online and in person.
Pro Tip: Start with a hosted checkout or payment link. You can always add an embedded form later. Switching the other direction, from a custom API build back to hosted, costs far more time.

Merchant account vs. PSP: which model fits your business?
These two models look similar on the surface but operate very differently.
A merchant account plus gateway model means your business holds a dedicated account at an acquiring bank. Funds flow from the card network to that account, then to your operating bank. Underwriting is more thorough upfront, settlement timing is predictable, and chargeback handling tends to be more structured. This model suits businesses with high monthly volume, industry-specific risk profiles, or complex payout needs.
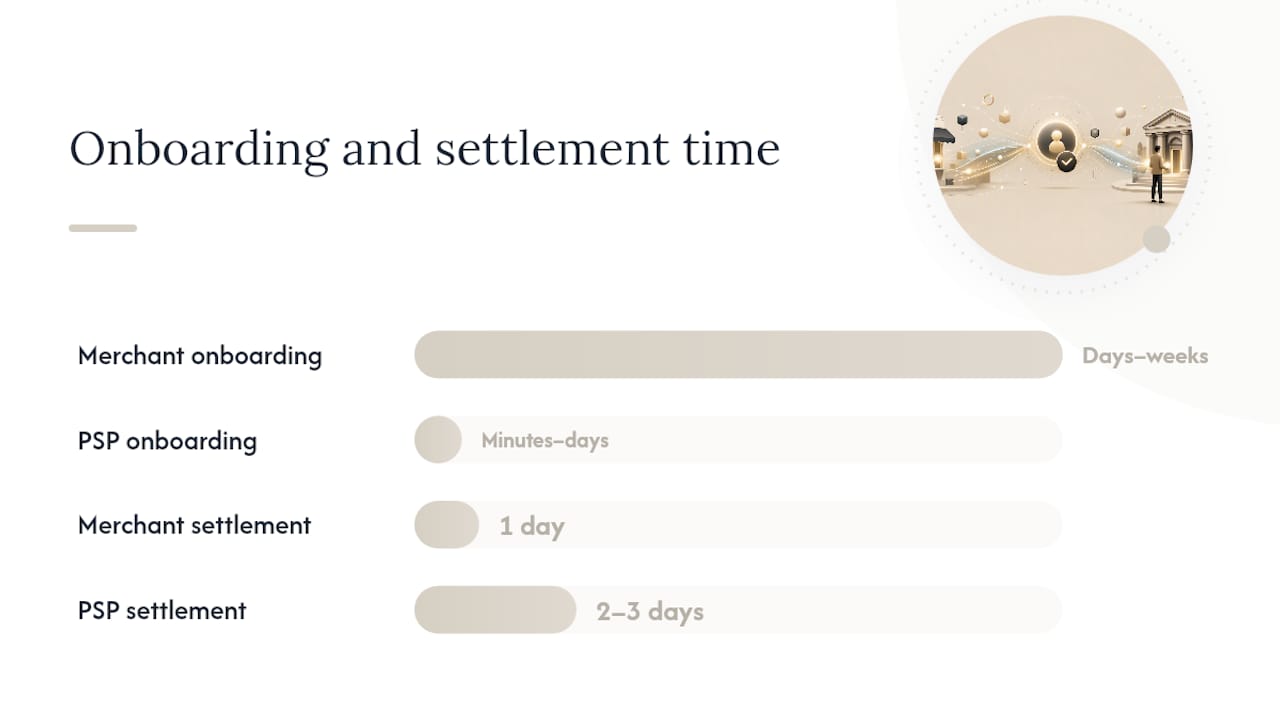
A payment service provider (PSP) bundles the merchant account, gateway, and often fraud tools into one product. Onboarding is fast, sometimes minutes, and pricing is transparent. The trade-off is that PSPs aggregate many merchants under one master account, which means they can place holds or terminate accounts if your transaction patterns look unusual.
| Feature | Merchant-account model | PSP model |
|---|---|---|
| Onboarding speed | Days to weeks | Minutes to days |
| Underwriting | Dedicated, upfront | Ongoing, automated |
| Settlement timing | Predictable, often next day | Typically 2–3 business days |
| Monthly fees | Often yes | Often no |
| Chargeback handling | Dedicated support | Self-serve tools |
| Best for | High-volume, established businesses | Early-stage and growing businesses |
Who fits the merchant-account model: businesses processing well above $50,000 per month, those in regulated industries, or those needing split payouts across multiple parties.
Who fits the PSP model: new businesses, creators, coaches, course sellers, and anyone who wants to go live fast without a lengthy underwriting process.
What do payment processing fees actually cost?
Fee structures are where small businesses lose money through confusion. There are four main models.
Interchange is the base cost set by card networks (Visa, Mastercard). It varies by card type, transaction type, and merchant category. You rarely pay interchange directly unless you are on an interchange-plus plan.
Interchange-plus pricing adds a fixed markup on top of the actual interchange rate. It is the most transparent model and usually the cheapest at volume, but the monthly statement is harder to read.
Flat-rate pricing charges one percentage (plus a small per-transaction fee) regardless of card type. It is easy to budget and common among PSPs. Card-present transactions typically run lower than card-not-present transactions.
Monthly and per-transaction fees can stack on top of either model. Watch for statement fees, monthly minimums, PCI non-compliance fees, and batch fees.
Sample ranges for common scenarios:
Watch for hidden costs: monthly minimums, payout delay fees, and international card surcharges can add up fast. Always read the full fee schedule before signing up, not just the headline rate.
How to integrate payments on your website
The right integration path depends on how much control you want and how much time you have.
Step 1: Hosted checkout (no-code). Your PSP generates a checkout URL or button. You paste it into your site or share it directly. Setup takes under an hour. PCI scope is minimal because card data never touches your server.
Step 2: Plugin or platform integration (low-code). If you use a website builder or e-commerce platform, install the PSP's official plugin. Configuration is mostly point-and-click. Stripe's developer docs cover Checkout Sessions, Elements, and embedded forms with configuration options for both one-time payments and subscriptions.
Step 3: API/SDK integration (developer route). Full control over the checkout UI, payment flow, and post-payment logic. Requires a developer, thorough testing, and a clear plan for handling webhooks and error states.
| Integration type | Setup speed | Customization | PCI scope | Developer needed |
|---|---|---|---|---|
| Hosted checkout | Hours | Low | Minimal | No |
| Plugin/platform | 1–2 days | Medium | Reduced | Rarely |
| API/SDK | Days to weeks | Full | Higher | Yes |
Testing checklist before going live:
- Run at least two test transactions using your PSP's test card numbers.
- Confirm the success and failure redirect pages work correctly.
- Test on mobile — a checkout that breaks on a phone loses real sales.
- Verify webhook delivery for order confirmation and payment events.
- Check that payout settings point to the correct bank account.
Pro Tip: A hosted or tokenized integration means card data never passes through your server. That alone drops you to the simplest PCI compliance tier (SAQ A), saving hours of annual compliance work.
Which payment methods should you offer first?
Start with the methods your customers already use, then add others as volume grows.
Core methods to launch with:
- Major credit and debit cards (Visa, Mastercard, American Express, Discover) — non-negotiable for any online business.
- One digital wallet (Apple Pay or Google Pay) — reduces checkout friction on mobile, where a significant share of purchases happen.
- PayPal — still expected by a large segment of online shoppers, particularly for higher-ticket purchases where trust matters.
Add these as you grow:
- ACH/eCheck — lower fees than cards, ideal for B2B invoices and high-value transactions. Typical ACH fees run well below card rates.
- Buy Now, Pay Later (BNPL) — relevant for higher average order values. Providers like Afterpay and Klarna integrate via PSP plugins.
International considerations: if you sell to customers outside your home country, check whether your PSP supports multi-currency checkout and local payment methods. Displaying prices in a customer's local currency can meaningfully improve conversion. Some PSPs handle currency conversion automatically; others require configuration.
Security basics every small business must handle
Security is not optional, and the good news is that a hosted or tokenized setup handles most of it for you.
PCI DSS basics: the Payment Card Industry Data Security Standard applies to any business that accepts card payments. Using a hosted checkout or a tokenized integration (where your PSP stores card data, not your server) reduces your scope to SAQ A, the simplest self-assessment questionnaire.
Required steps:
- SSL certificate on every page of your site, not just checkout.
- Tokenization — let your PSP store card data as a token. Never store raw card numbers yourself.
- Strong passwords and MFA on your payment dashboard and any connected admin accounts.
- Secure webhooks — validate webhook signatures to prevent spoofed payment events.
Fraud prevention tools to enable:
- Address Verification Service (AVS) — matches billing address to card records.
- CVV checks — require the card security code on every transaction.
- Velocity limits — flag or block multiple rapid transactions from the same card or IP.
- Monitor chargeback rates — a rate above 1% can trigger account reviews or termination by your PSP.
Pro Tip: Fraud rules that are too aggressive block real customers. Start with AVS and CVV checks, then tune velocity limits based on your actual dispute data rather than setting them at maximum from day one.
When evaluating any payments partner, it is worth checking whether they hold relevant registrations or disclosures. Public registries like FINRA and the SEC's adviser disclosure system are useful models for the kind of transparency a trustworthy financial services firm should offer. Similarly, SIPC clarifies what protections apply in specific financial contexts — a reminder to always verify what safeguards, if any, cover your funds with a given payments partner.
How to set up recurring payments and reduce churn
Subscription revenue is predictable, but only if your billing system handles failures well.
Three recurring billing structures:
- Automatic card charges — the most common. Your PSP charges the saved card on a set schedule.
- ACH subscriptions — lower cost per transaction, better for B2B or high-value monthly plans.
- Invoice-based recurring payments — send a recurring invoice and let the customer pay manually or via a saved method.
Stripe's billing docs cover all three paths, including hosted Checkout pages, embedded forms, and API-based subscription management.
Dunning best practices to reduce involuntary churn:
- Send a payment reminder 3–5 days before a card is charged or a trial ends.
- On a failed payment, retry automatically after 3 days, then 5 days, then 7 days.
- Notify the customer by email after the first failure with a clear link to update their card.
- After three failed retries, pause the subscription and send a final notice before canceling.
Authorize.net's recurring billing tools illustrate how automated retry logic reduces the manual work of chasing failed payments and cuts involuntary churn compared with manual processes.
Store billing metadata (plan name, billing cycle, next renewal date) on every invoice. It saves time when customers contact support and simplifies revenue recognition.
Your go-live checklist and realistic timeline
What you need before you go live:
- Legal business name and address
- Bank account for payouts (routing and account number)
- Government-issued ID for identity verification
- Tax identification number (EIN in the US, or equivalent)
- Clear product or service descriptors (what appears on the customer's bank statement)
- Website URL with a published refund and privacy policy
Typical timeline:
- Account creation — 15–30 minutes.
- Identity and business verification — same day to 3 business days, depending on the PSP and your documentation.
- Integration and testing — a few hours for hosted checkout; 1–5 days for a plugin; 1–3 weeks for an API build.
- First payout — typically 2–7 days after your first live transaction, then on a rolling schedule.
To shorten underwriting time, have clean documentation ready: a clear business description, a working website, and a bank statement if requested. Vague product descriptions ("consulting services") slow reviews. Specific ones ("12-week online fitness coaching program, $299/month") move faster.
What I'd actually recommend for most small businesses
Start with a hosted checkout or an all-in-one platform that has payments built in. The argument for building a custom API integration from day one is almost never strong enough for a business under $10,000 per month in revenue. The time cost is real, the compliance overhead is real, and the conversion difference between a well-designed hosted page and a custom form is smaller than most people expect.
The moment to consider a dedicated merchant account or custom integration is when you hit consistent high monthly volume, expand to multiple currencies with complex tax handling, or need split payouts across contractors or partners. Those are real triggers. "I want more control" alone is not.
For creators, coaches, and course sellers specifically: the biggest friction point is not the payment form itself. It is the gap between the payment and everything that happens next — provisioning course access, updating membership status, triggering a welcome email, logging the sale in your CRM. An integrated platform that connects checkout to those workflows is worth more than a slightly cheaper per-transaction rate.
Why Aria makes accepting payments simpler for creators and entrepreneurs
Most small businesses end up stitching together a payment processor, a course platform, a membership tool, and a CRM — and paying for all of them separately. Aria is built to replace that stack. Checkout, subscription management, invoicing, payout settings, and CRM are connected in one dashboard, so a sale automatically updates membership access, triggers your welcome sequence, and logs the customer record without any manual work.
For creators and entrepreneurs who sell courses, memberships, or digital products, that integration is the real time-saver. Aria claims to save users over $700 per month in tool costs by consolidating what would otherwise be four to six separate subscriptions. The Aria platform covers community management, online courses, website and funnel building, email and SMS marketing, and payment processing under one plan.
Ready to go live without the tool juggling? Start your Aria trial and have your first checkout live today.
Sources
These sources are worth bookmarking for deeper technical setup or regulatory verification: